How to connect an aws ec2 instance with windows.
Amazon Web Services (AWS) Elastic Compute Cloud (EC2) is a
key service provided by AWS that offers resizable compute capacity in the
cloud. Designed to make web-scale cloud computing easier for developers, EC2
enables users to launch virtual servers, known as instances, on demand, with a
wide variety of configurations available to meet diverse computing needs.
How to connect EC2 with windows?🤔
Do you have any idea?
One of the way is using putty. Yes, PuTTY is a popular SSH and telnet client for Windows
that allows users to remotely access and manage computers, typically Linux
servers. While PuTTY is primarily used to connect to Linux instances, it can
also be used to connect to EC2 instances if you are working with SSH keys.
Why to use Putty:
Development and Testing
- Remote Administration
- Managing EC2 Instance
- Wide Compatibility
- Security
- Portability and Simplicity
- Configuration and Customization
- Key Pair Management
- SSH and Telnet Client for Windows
Steps to use putty:
Step 1: Create an EC2 instance.
- Open your aws console account in any browser.
- Search for VPC in the resources. Click on create an vpc and name it as your wish (ex: myvpc).
- Create subnet, route table and internet gateway. Which are necessary fields in vpc creation and connection with instance.

Fig.1: VPC creation.
- Search for EC2 in the resource and click on launch instance. Name it as your wish(ex: Myec2.)
- Note: Don't give any spaces in naming of vpc and ec2.
- Select key pair and download it in ppk format.
- Select the operating system required.
- And launch the instance.
- Click on instances and select the newly created instance in the interface and copy the public IP address.

Fig2. EC2 launch.
Step 2: Download putty.
- Open any browser and search for download putty.
- Click on the first link in the page faults.
- In the interface click on download putty.
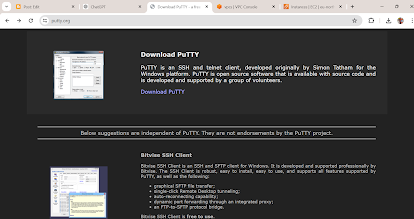
Fig 3: Download putty.
- Click on the Windows installer based on your system configuration.
- There you can see putty file is downloaded in your system.

Fig 4: Putty Windows installer.
- Grate your almost there to connect your instance with windows.
Step 3: Install Putty
- Click on the downloaded putty and finish the installing steps.
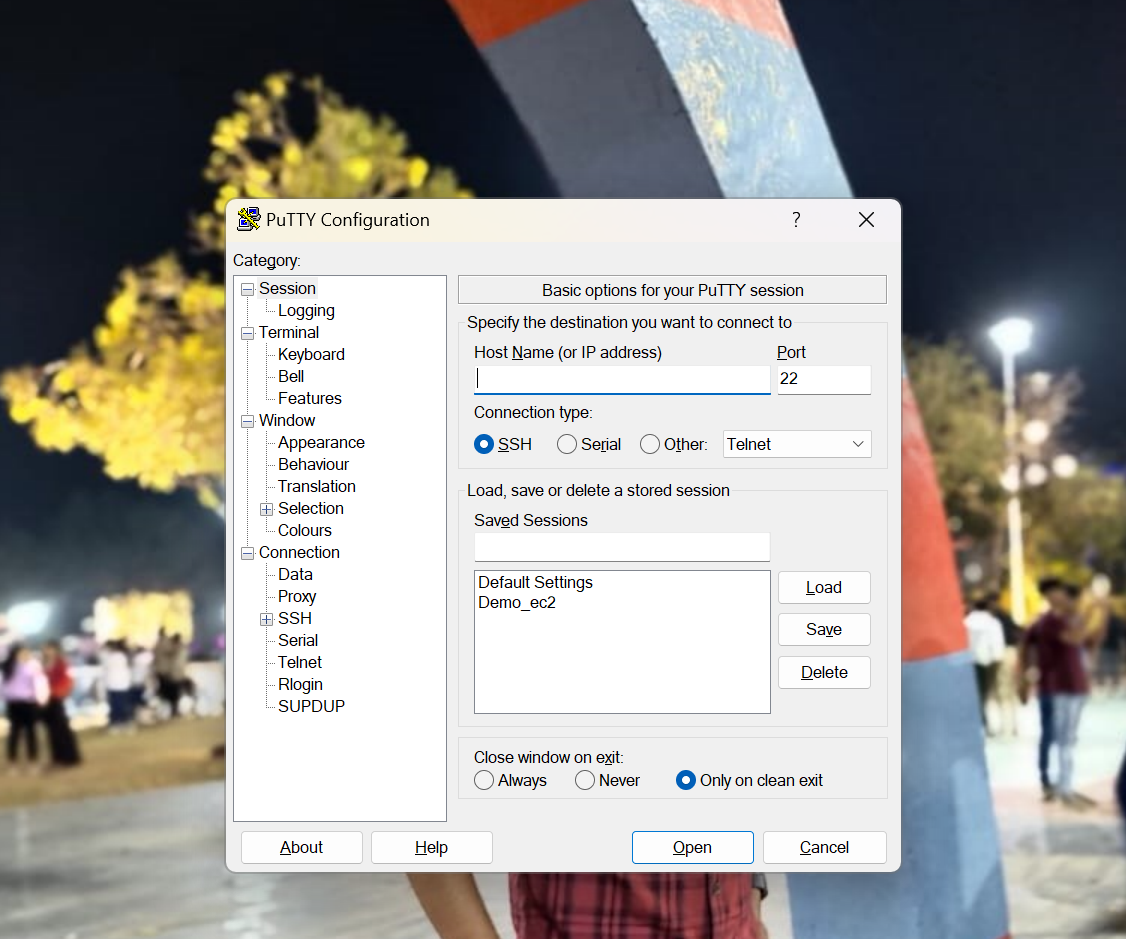
Fig 5: Putty installed successfully.
- Awesome your one step away to connect.
Step 4: Connect the instance with putty.
- Enter the valid IP address of the instance.

Fig.6: EC2 IP address.
- And click on the Data in the option and name the user as your wish (ex: ec2-user).

Fig.7: Specify user.
- Now click on the ssh and in the ssh list click on auth from there choose credentials and insert the downloaded keypair.ppk file in it.

Fig.8: Keypair insertion.
- Finally click on session and name it as your wish and save it.

Fig.9: Save the session.
- WOW! We are at final click. 😉 Now click on Open.
- In the interface click on Connect once for the current session.
- Hey! There we have connected the instance with putty.

Fig.10: Ec2 connected with putty.
Happy Coding.
Thank you!
😊🧑💻
Comments
Post a Comment